
At Google I/O 2018 the Android team introduced a feature that has long been coveted by Android developers. That is, an Android Studio version of Xcode’s storyboard, which Google calls a navigation graph.
Navigation graphs are a new resource that simplify everything about navigation including argument passing, animations, backstacks, and deep linking. The only catch is this can only be done for fragment transitions. Every navigation graph belongs to a single activity and you cannot navigation between activities within a single navigation graph. We’ll explore how starting and returning to activities works with the navigation graphs later. For now, let’s get started.
You must be on Android 3.3 or higher to use the navigation graph. I’m also using kotlin and and androidx in this example, but neither of these things are required for using the navigation graph.
The first thing you need to do is declare the required dependencies.
//Navigation
def nav_version_ktx = "2.1.0-alpha06"
implementation "androidx.navigation:navigation-fragment-ktx:$nav_version_ktx"
implementation "androidx.navigation:navigation-ui-ktx:$nav_version_ktx"
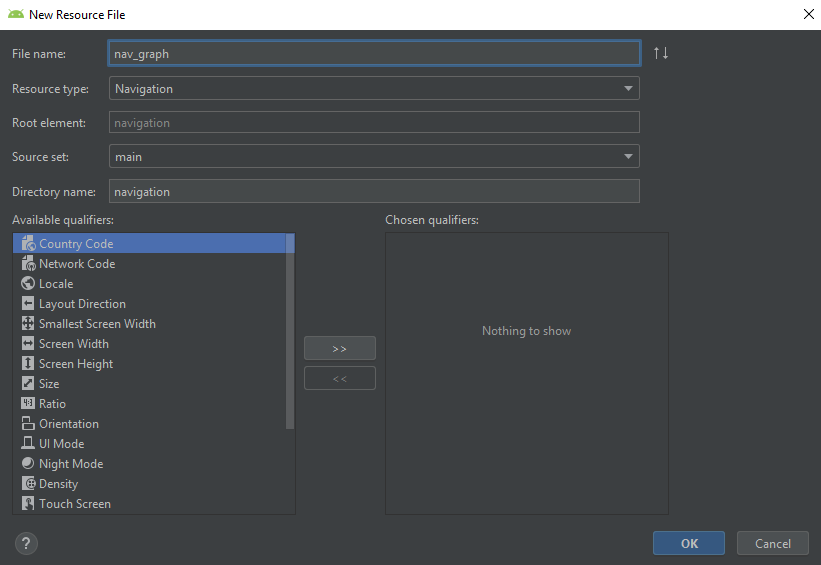
Next we’ll add a navigation graph to the project. To do this, simply right click on the res folder > New > Android Resource File. Then in the New Resource File window set the resource type as “Navigation” and set your navigation graph file name and hit “OK”.
Now open your newly created navigation graph. You’ll notice on the left side under Destinations and HOST there is a message that says “No NavHostFragments found”. We can fix that by adding a NavHostFragment to an activity. This is where all fragment transactions handled by the navigation graph will happen, and is why every navigation graph has to have its own activity. You can add a NavHostFragment to your activity by putting the following xml inside your activity’s xml layout file:
<fragment
        android:id="@+id/nav_host_fragment"
        android:name="androidx.navigation.fragment.NavHostFragment"
        android:layout_width="0dp"
        android:layout_height="0dp"
        app:layout_constraintLeft_toLeftOf="parent"
        app:layout_constraintRight_toRightOf="parent"
        app:layout_constraintTop_toTopOf="parent"
        app:layout_constraintBottom_toBottomOf="parent"

        app:defaultNavHost="true"
        app:navGraph="@navigation/nav_graph" />
There are some new attributes introduced here that I’ll try to quickly summarize.
- android:name - This is simply the NavHostFragment implementation. For this example we’ll be using the default google provided NavHostFragment.
- app:defaultNavHost - If set to true the NavHostFragment will intercept the system back button. This should be set to true in most cases.
- app:navGraph - A reference to the navigation graph resource you want to use with your NavHostFragment goes here.
Now go back to your navigation graph and you’ll see your new NavHostFragment listed on the left (woohoo!). Let’s start adding destinations to our graph. Click on the new destination icon in the nav graph toolbar and choose “Create new destination”.
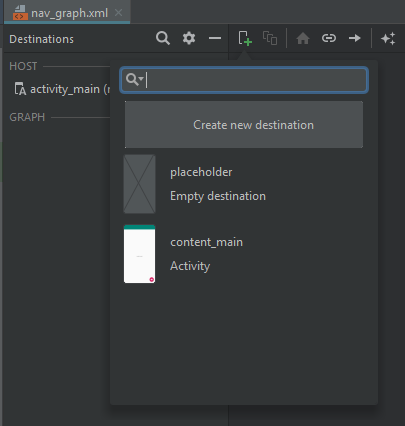
A new window will appear where you’ll create a new fragment. Name your fragment and click “Finish”. The newly created fragment will be visible in the Navigation Graph and will have a home icon next to it signifying that it is the starting fragment.
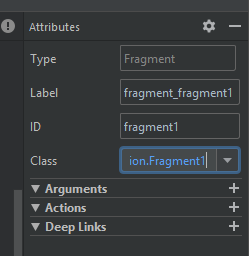
Select the new fragment in the graph and you’ll see it’s attributes on the right. These include basic values such as label, ID, and Class. It also includes sections for Arguments, Actions, and Deep Links, which are the true power of the Navigation Graph.
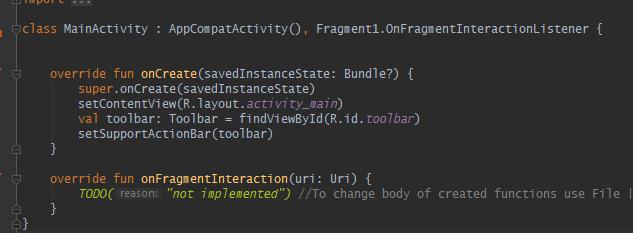
Let’s go ahead and run the project. Unless you’re one step ahead of me you’ll hit a runtime error that basically says that your activity which is hosting the NavHostFragment needs to implement the OnFragmentInteractionListener for the fragment you added to your graph. Do this as shown below and re-run the project and you should see your fragment displayed in the main activity.
Now let’s add a second fragment which we will navigate to from our first fragment. After you add the second fragment, click the circle on the right side of the first fragment and draw an arrow from it to the second fragment. Congratulations! You just created your first navigation action.

Click on the action arrow to select it. The attributes for the action will be shown on the right, specifically the action ID. This is what we will use to trigger the action in our original fragment. Add a button to your first fragment and set its onclicklistener to trigger the action you just created using it’s action ID.
view.button.setOnClickListener { view ->
	view.findNavController().navigate(R.id.action_fragment1_to_fragment2)
}
You’ll also need to implement the OnFragmentInteractionListener for the new fragment you created in your activity as you did previously. Now run your project and test out your action. You’ll also notice that after navigating to the second fragment hitting the system back button automatically goes back to the previous fragment without writing any additional code in the activity. This is one of the many advantages of the Navigation Graph!
The navigation graph also makes passing arguments between fragment’s a breeze. First we need to add an additional gradle plug-in in our Project’s build.gradle:
//Navigation Safe Args
def nav_version = "2.1.0-alpha06"
classpath "androidx.navigation:navigation-safe-args-gradle-plugin:$nav_version"
And apply the plug-in in your app’s build.gradle:
apply plugin: "androidx.navigation.safeargs"
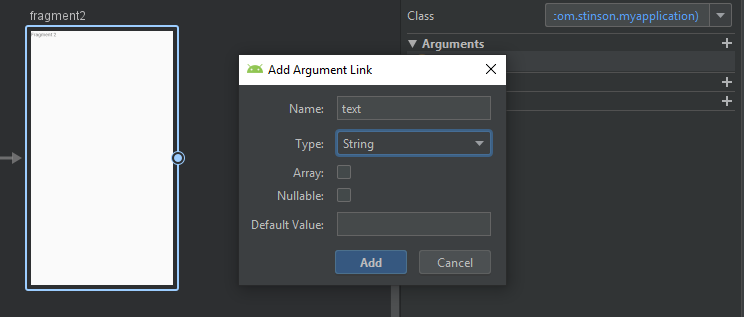
Now go back to your navigation graph, select the second fragment, and in the attributes panel on the right click on the “+” next to the arguments header. A window will appear to specify your argument’s name and type. Set its name to “text” and type to “String”.
Now rebuild your project in order to generate the classes we need to use the argument. Doing this will create the Fragment1Directions and Fragment2Args classes (or similar classes using your fragment’s names). Now go to the onclicklistener that we made to navigate from fragment 1 to fragment 2. We’re going to edit the code inside it as follows:
val directions: NavDirections = Fragment1Directions.actionFragment1ToFragment2("This is my argument!")
            view.findNavController().navigate(directions)
Generated directions classes are a different and often better way to navigate to an action. It also allows for the passing of arguments to the action’s destination fragment.
In Fragment 2 we use the arguments like this:
val args by navArgs<Fragment2Args>()
view.textView.text = args.text
Now run your project again and the text on fragment 2 should match the argument value you passed into Fragment1Direction. Awesome!
Navigation graphs also are very helpful in implementing deep links and handling all the issues that can come with them, but I won’t cover that today, as it’s one of the less common use cases.
But before I go, let’s quickly see how we can navigate to another activity using the navigation graph, because while we need separate navigation graphs for each activity, we can still facilitate moving to the next activity within the previous activity’s graph.
Create a new activity using one of the predefined Android activities. Now add a new destination to the graph and select the activity you just created. Place it and draw an action from fragment 2 to the activity. Your navigation graph should now look like this:

Now add a button to fragment 2 and trigger the action leading to the new activity like we did previously for navigating to fragment 2. Run your project one last time and you’ll see that hitting the button starts the new activity and when you hit back your app returns to the previous activity while maintaining the navigation graph’s backstack.
I’ve covered just the very basic, but powerful, features of the new Navigation Graph. There’s more to this new resource than what I’ve covered, but this should be a great starting point for anyone looking to transition to using the new Navigation Components. Until next time!